
This worked eventually. I tripped over this recipe from Emilie Raffa for sourdough bread making. I had tried various sourdough recipes before early my bread making years without much success. These days with the pandemic pandemonium, maturity of years and the newly discovered ability to be patient, I tried once more. After several unsuccessful attempts I found Ms. Raffa’s website. Go visit for other recipes.
Sourdough starter instructions
Combine 60 g of whole wheat flour and 60 g of warm water. This is a good place for filtered water. A quart Mason (canning) jar is a good container. Stir everything together with a fork or the handle of a long wooden spoon. (I have a collection of wooden spoons I use for baking and cooking.)
You are going to dump some out and stir in more flour over a period of DAYS. Do not be in a hurry and do not despair if the starter does not seem to be functioning as advertised at first. Find a place on your counter where you can watch the magic happen and it is not in the way of other activities. The list below is from Emilie Raffa.
- Day 1: 60 g flour + 60 g water = 120 g starter
- Day 2: Do nothing
- Day 3: Remove & discard half of the starter/ 60 g starter + 60 g flour + 60 g water = 180 g starter
- Day 4: Remove & discard half of the starter/ 90 g starter + 60 g flour + 60 g water = 210 g starter
- Day 5: Remove & discard half of the starter/ 105 g starter + 60 g flour + 60 g water = 225 g starter
- Day 6: Remove & discard half of the starter/ 112.2 g starter + 60 g flour + 60 g water = 232.5 g starter
- Day 7: Remove & discard half of the starter/ 116.25 g starter + 60 g flour + 60 g water = 236.27 g starter
Sourdough bread recipe
This is very simple.
- 150g of starter,
- 250g filtered water,
- 500g of bread flour,
- 25g of olive oil,
- 10g of salt
My notes: bottled water is often ultra filtered or reverse osmosis purified. Reverse osmosis is another filtering technique. If you use tap water you may not get the results you want. Use sea salt if you have it.
… add 1 C (200g) of rye flour soaked overnight with 1/2 C of water, 1 Tbsp. of caraway seed and remove 100g of bread flour for sourdough rye.
… OR add 1 C (200g) of whole wheat flour with 1/2 C of water. It is not necessary to soak whole wheat over night but if you want to – go for it. Wisk the wheat flour and wait for a bit. 100g less of the bread flour and less water.
I am still experimenting with the correct mix for a nice loaf.
Ms. Raffa and I diverge here. She wants to mix everything by hand which you can do if you want. I bought a fine Kitchen Aide mixer in 1987 or so and am in love with it and how it operates. I have had it repaired once in 1990 and it has worked perfect since. As a result I mix very little by hand if I have an option.
I use the paddle to bring the mixture together until the flour is fully absorbed. The dough will look dry, rough and shaggy.
Cover the bowl with plastic wrap, reusable wax wrap, or a very damp kitchen towel and let rest or ‘autolyse’ for about 30 minutes. My mixer has a stainless steel bowl. I use plastic wrap and rubber-bands (elastics) to keep the plastic in place.
After the dough has rested, I use the dough hook to mix for a bit more. Over the years I have developed a sense of how the dough tries to climb the hook and how it cleanses the bowl sides to get a feel for the texture. A dough that does not have enough flour will not hold its shape. I mix on “2” and use 2 or 4 when using the dough hook. I run the hook for about 4 minutes after I have decided the dough looks “good.”
Dump the mixer bowl onto a floured counter and work it into a ball. Place it directly into a glass bowl. You do not have to grease the bowl but if I make rye bread I grease it with lard. Rye dough is sticky. (It doesn’t have to look perfect but it is nice if it is pretty round.) As the dough rises the yeast will develop the gluten further.
Cover the bowl with plastic wrap. Place it in a warm spot (I use the oven and turn on the oven light.) Wait for the magic to happen. This part can take up to twelve hours, so, overnight is good here.
Ms. Raffa describes a pull-stretch-turn technique to help the dough develop. I recommend this. It gives one the opportunity to feel how the dough is developing and its moisture content. If you are unsatisfied with the moisture, turn it out on a floured work surface and knead more flour into the dough and return to the bowl and let rise some more.
Once you are satisfied with the dough and it has essentially doubled in size in the bowl, cut a piece of parchment paper big enough to line the bottom of a dutch oven. Dump the dough onto your counter (lightly floured) and shape into a ball. Put the ball of dough seam side down into the dutch oven and put the lid on. Set your timer for 20-30 minutes. After the timer has finished preheat the oven to 450F. (I know my measurements were in grams, what can I say? I’m a yank. — 232C)
When the oven is happy (up-to-temp), slit the top of the loaf with a sharp knife about 2 inches (5cm) put the dutch oven in the oven with the lid on and set the timer for 20 minutes. Reset the oven temperature to 425F (218C). When the timer is satisfied, remove the lid and reset the timer to 40 minutes. Continue baking at 425 for the rest of the period. (Total time 60 minutes – but watch the color.)
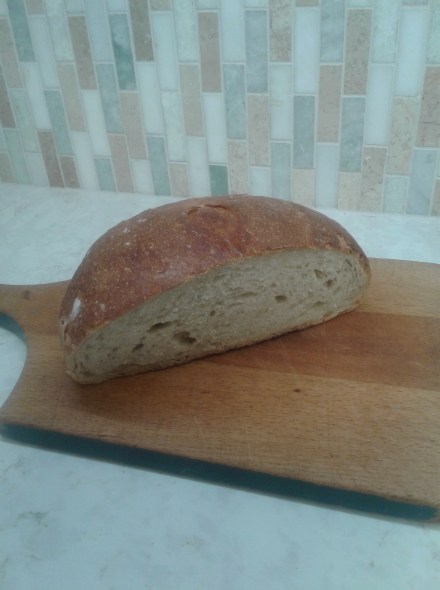
When it is done it will be a nice brown shade as in the picture above. Wait about an hour before cutting the loaf. You will not burn yourself and the bread will taste better. What you can’t see is that about half of the loaf disappeared at breakfast as French Toast. (Yum, baby!)

Baking is a hobby and a passion I have had for a long time. I plan to spend the next few months experimenting with sourdough recipes.
